Why iOS Backups Are Silently Eating Your Mac's Storage
Every time you connect an iPhone or iPad to your Mac and sync it through iTunes (on older macOS versions) or Finder (on macOS Catalina and later), your Mac quietly creates a full local backup of that device. These backups are designed to be a safety net, but over the years, they have a habit of becoming a hidden storage crisis.
The problem compounds with each device upgrade. When you move from one iPhone to the next, a new backup is created for the new device, but the old backup is rarely deleted automatically. After two, three, or four device cycles, you can easily have a collection of backups sitting on your Mac that you have completely forgotten about. Each individual backup can run to tens of gigabytes depending on how much data, photos, and app content was on the device at the time it was created.
Perhaps the most common scenario is one that catches even experienced Mac users off guard: switching to iCloud backup does not remove any local backups that already exist on your Mac. Many people assume that enabling iCloud backup means their Mac is no longer involved in the process but those old local snapshots remain exactly where they were, silently occupying precious disk space.
How the Backups Stack Up Over Time
- A single full iPhone backup can occupy anywhere from 5 GB to well over 100 GB,
- Multiple devices in a household — iPhones, iPads, iPods — each generate their own separate backup files,
- Backups from devices you no longer own may still be stored on your Mac,
- Neither macOS nor iTunes sends any alert when backup storage grows large.
Because these files live deep inside your Mac's Library folder rather than in an obvious location like the Documents or Downloads folder, most users never stumble across them during routine tidying. The result is gigabytes — sometimes hundreds of gigabytes across a household's worth of devices — quietly consuming space that macOS may eventually flag as your startup disk being almost full.
Where iOS Backups Hide and Why You Can't Just Delete Them
When you connect an iPhone or iPad to a Mac and back it up through Finder (or the older iTunes), macOS stores the resulting backup data in a specific folder deep inside your user Library:
~/Library/Application Support/MobileSync/Backup/Each device gets its own subfolder named with a long alphanumeric identifier, making it nearly impossible to tell at a glance which backup belongs to which device or how old it is. Because the Library folder is hidden from casual Finder browsing by default, most users never stumble across these backups — and they quietly accumulate gigabytes over months or years.
The MobileSync folder sits within a part of the file system that macOS treats as system-adjacent user data. While it is not locked behind System Integrity Protection the way core OS files are, the folder structure is managed by Finder and the backup daemon, meaning the files inside carry metadata and integrity references that ordinary drag-to-Trash deletion can disrupt. Simply handling to the folder and deleting subfolders in Finder is unreliable: macOS may block the deletion outright, silently skip locked files, or leave behind orphaned index files that still report storage usage to the system.
The more serious risk is backup corruption. An iOS backup is not a single file — it is a structured collection of thousands of individual files, a manifest, and a database that tracks every item. Force-deleting part of that structure outside of an approved method might leave a partial backup that appears intact in Finder but is completely unrestorable. If you ever need to recover contacts, photos, or app data from that backup, a corrupted set is worthless. For these reasons, Apple provides a dedicated management interface specifically to handle backup removal safely.
The Right Way to Delete iOS Backups: System Settings Storage
The safest and most straightforward way to find and remove old iOS backups on a Mac is through System Settings — no third-party tools required. Apple provides a built-in storage manager that lists every backup stored on your machine, complete with identifying details so you never delete the wrong one.
Step-by-Step: Accessing iOS Backup Storage
- Open System Settings from the Apple menu or your Dock.
- Click General in the left-hand sidebar.
- Select Storage and wait a moment for macOS to calculate disk usage.
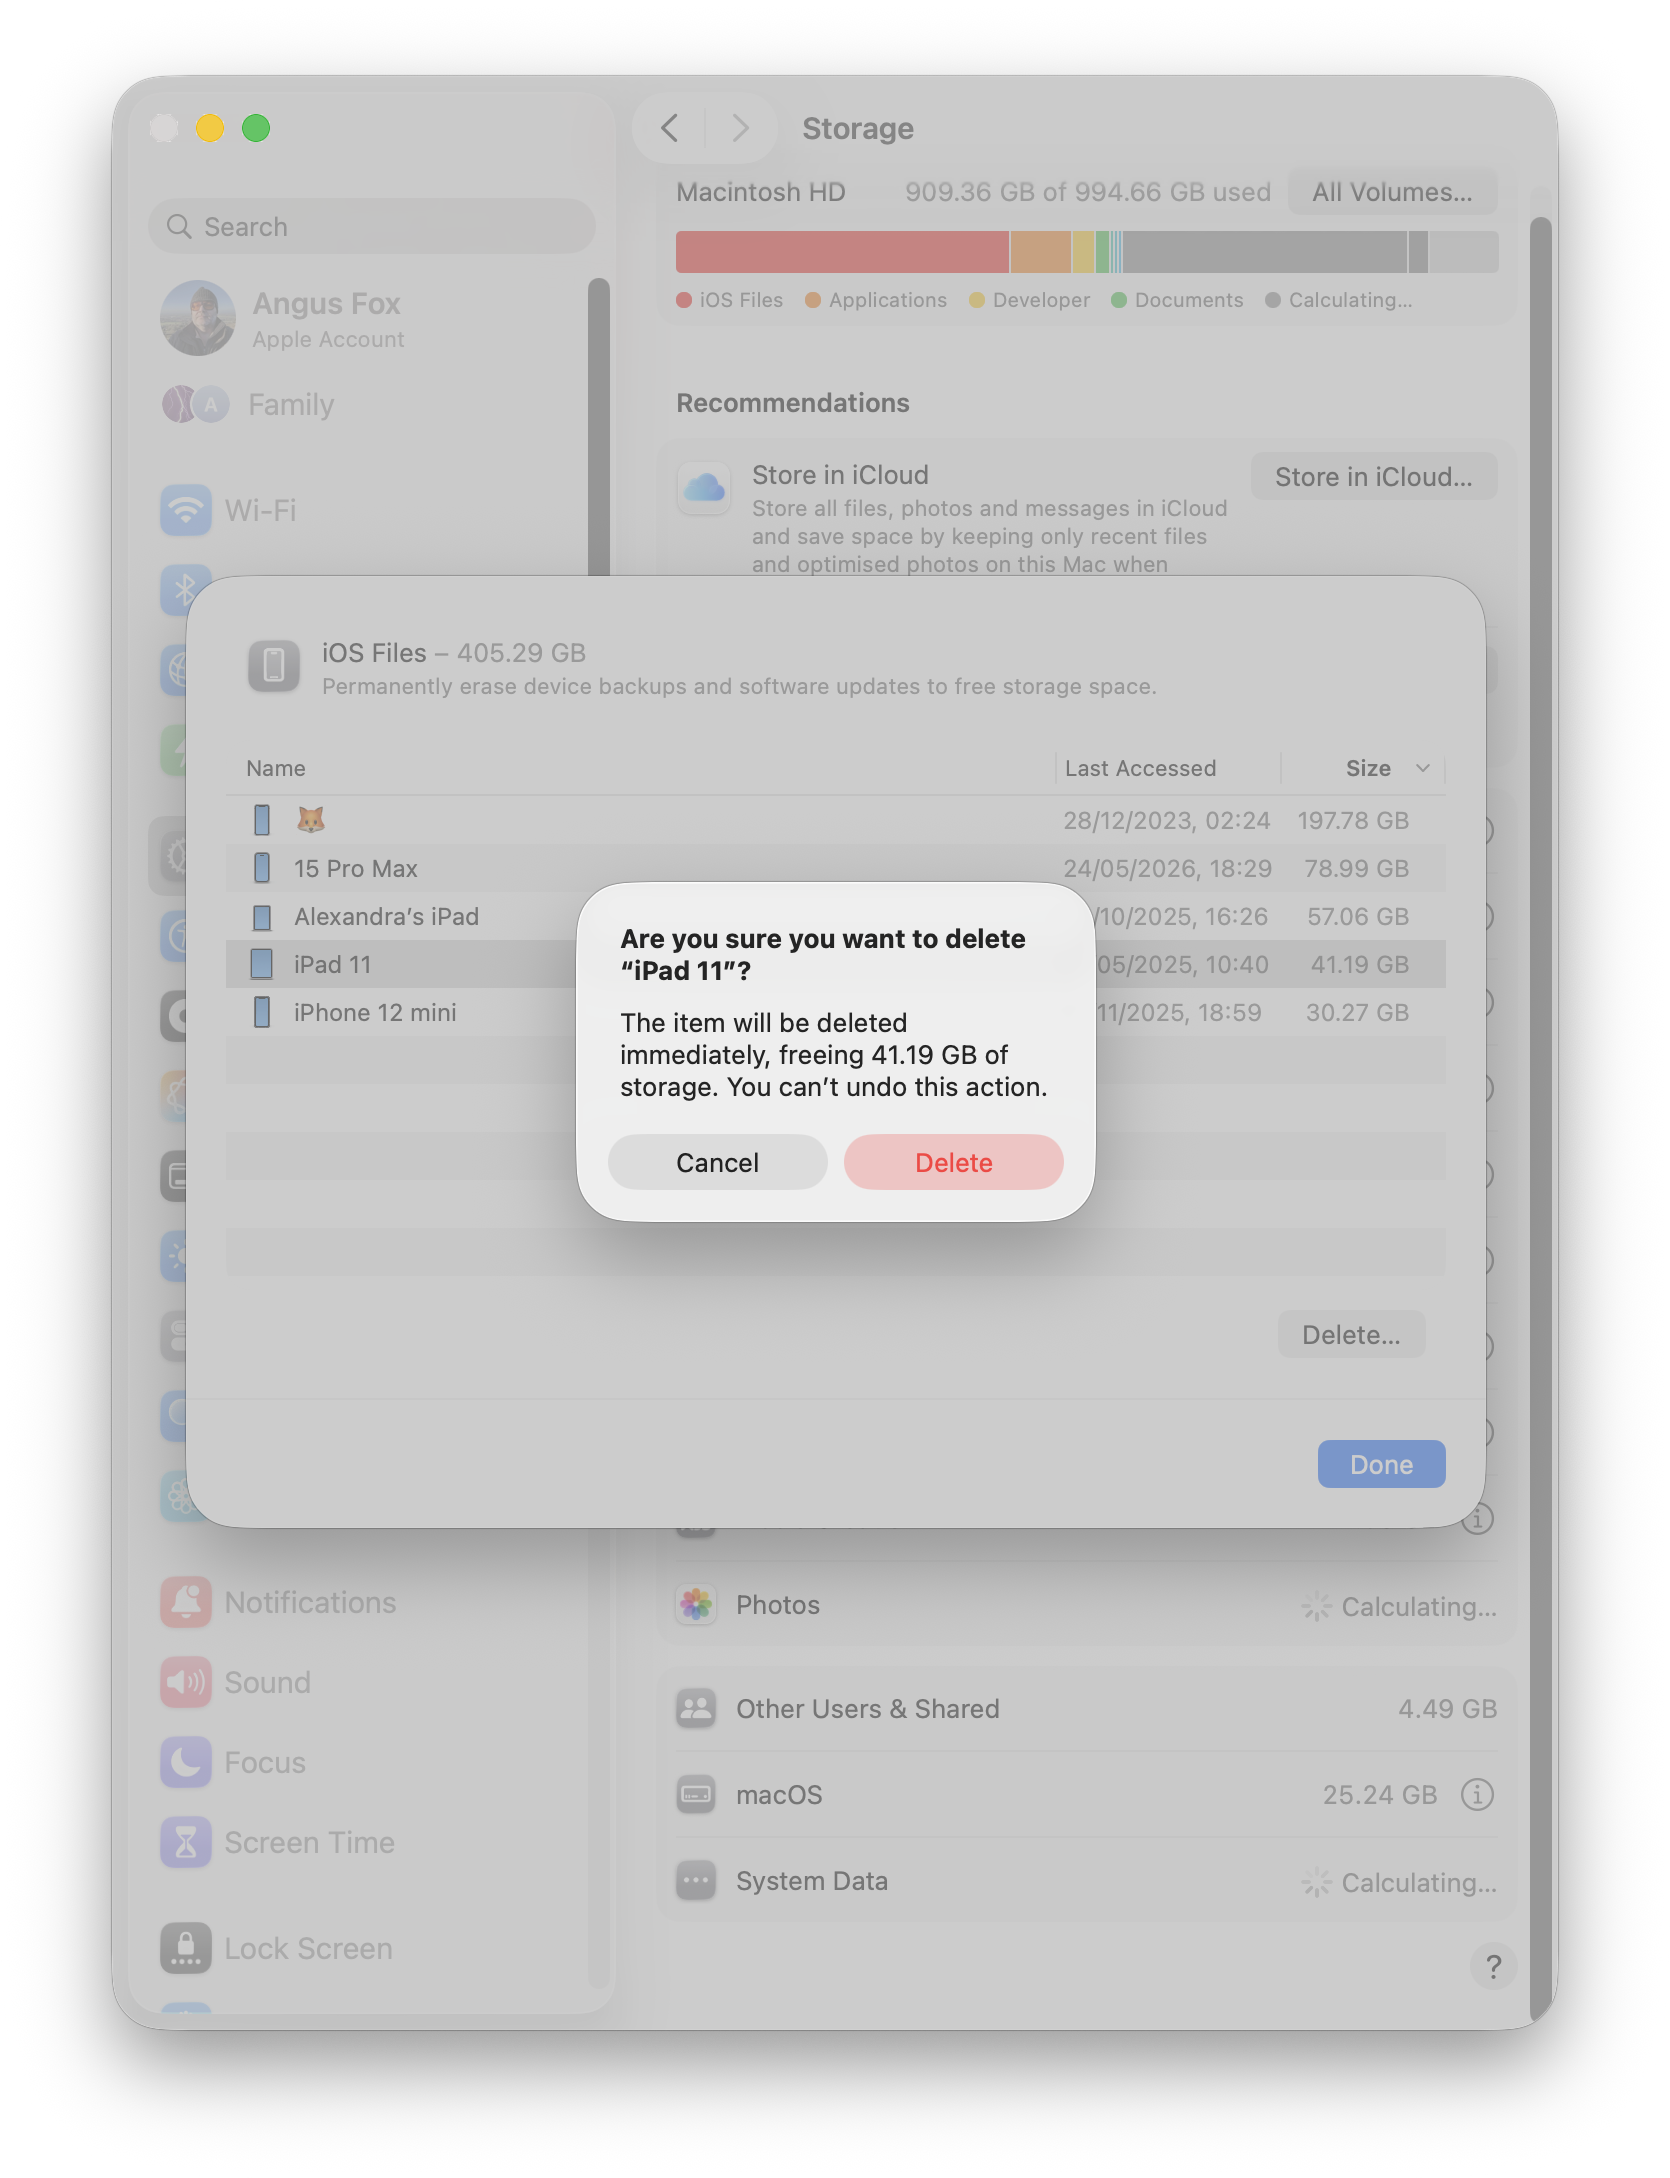
- Scroll down until you see the iOS Files category and click it to expand the list.
Identifying Which Backup Belongs to Which Device
Each entry in the iOS Files list displays the device name (for example, "Jane's iPhone 13"), the date of the last backup, and the size of that backup file. Use these details to determine whether a backup is current and still needed. A backup dated more than a year ago, or one belonging to a device you no longer own, is almost certainly safe to remove.
Selecting and Permanently Deleting Old Backups
To delete a backup, click on its entry to select it, then choose Delete. macOS will ask you to confirm before permanently removing the files. Take a moment before confirming to double-check the device name and date as deletion is immediate and cannot be undone from this menu.
If you have multiple old devices or have been backing up to your Mac for several years, it is common to find gigabytes of redundant backup data here. Removing backups for devices you no longer use is completely safe and will not affect your current iPhone or iPad in any way.
After the Cleanup: Keeping iOS Backup Clutter Under Control
Deleting old iOS backups is satisfying, but the real win is making sure they never pile up again. A few simple habits will keep your Mac's storage breathing easy long after today's cleanup.
Switch to iCloud Backups Going Forward
The most effective way to stop local backups from accumulating is to stop creating them in the first place. On your iPhone or iPad, go to Settings > [Your Name] > iCloud > iCloud Backup and turn it on. Once iCloud Backup is active, iTunes and Finder will no longer create local snapshots automatically when you connect your device. Your backups happen wirelessly overnight, and your Mac's drive stays clear.
Schedule a Post-Upgrade Storage Review
Every time you upgrade to a new iPhone or iPad, your old device's final backup lingers on your Mac — and it's usually one of the largest. Make it a habit to open System Settings > General > Storage after any major device upgrade and check the iOS Files section. A five-minute review right after setup can prevent gigabytes of forgotten data from sitting untouched for years.
Other Quick Storage Wins to Check Next
With iOS backups out of the way, a few other categories are worth a look while you have the Storage panel open [2]:
- Large applications — sort your Applications folder by size in Finder's List View to spot bloated or unused apps
- Downloads folder — installer packages and disk images accumulate quickly and are rarely needed after first use
- Mail attachments — years of received files can quietly consume gigabytes of space
- Trash — files deleted but never emptied still occupy real disk space until the Trash is cleared
Tackling these areas one at a time, starting with the largest offenders, is all you need to do — no third-party disk-scanner purchase required but I am a fan of OmniDiskSweeper which is a decades old and trusted free tool.