Multizone | All our technotes
If we've published it, you can find it here.

Terminal prompt with architecture in 2026
If you are running macOS on Apple Silicon — or still maintaining Intel machines alongside them — your terminal prompt can do more work for you. In a world where Rosetta 2 translation, native arm64 binaries, and cross-architecture Docker builds are everyday realities, knowing at a glance which architecture your current shell is running under is genuinely useful. zsh-powerline, a shell implementation inspired by the powerline statusline plugin for vim, makes this easy to set up and keep tidy.
For me, modifications must not hurt performance and should not be distracting. Prompt elements must be things I really need to know about the current environment right now — not decorative noise.
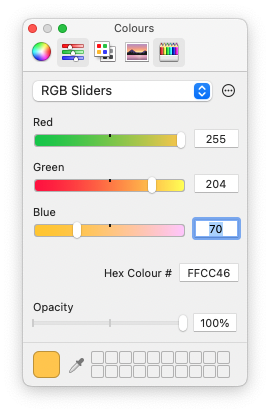
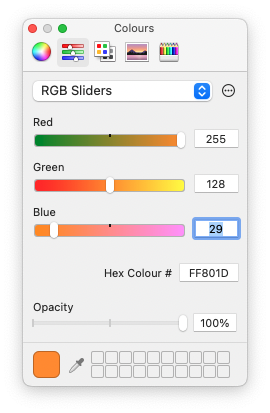
The text colours are a nod to the terminals I used at Sun Microsystems. Some things are worth keeping.
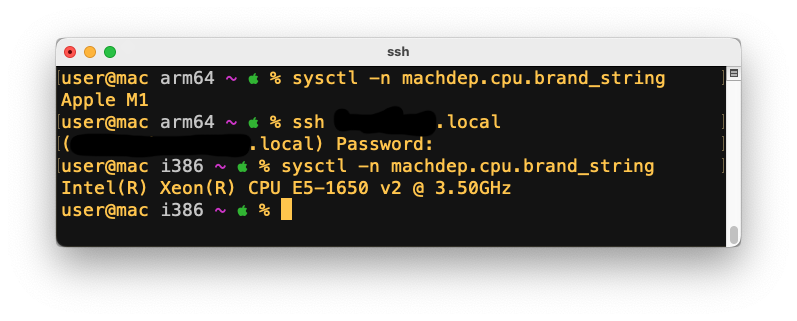 When you ssh to a different machine running the same zsh environment, the prompt updates automatically. That is exactly what I need.
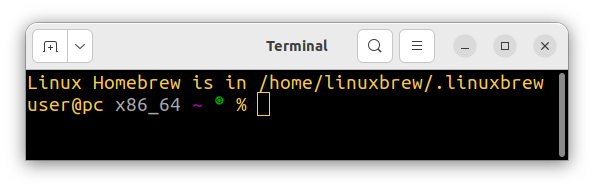
This prompt shows username, hostname, architecture, git branch, exit status of the last command, OS symbol, and shell prompt character. When you connect to an Intel-based Mac or a Linux box, the architecture segment changes to reflect it. That distinction matters more now than it did when Apple Silicon first launched — the ecosystem has matured, the edge cases are subtler, and the consequences of running the wrong binary silently under Rosetta are harder to spot.
{ToC}
Why architecture still matters in your prompt
By 2026 the vast majority of Mac hardware shipped is Apple Silicon — M3, M4, and their Pro, Max, and Ultra variants — but mixed fleets remain common in teams and homelabs. More importantly, developers routinely open Rosetta-translated terminal sessions deliberately, to build or test x86_64 code, run older toolchains, or work with containers targeting amd64. A plain shell gives you no signal about which world you are currently in. A single architecture segment in your prompt removes that ambiguity entirely.
The same applies when you are ssh-ing between machines. A remote Linux server running on x86_64 hardware, an arm64 Raspberry Pi, or an AWS Graviton instance all look identical in a plain prompt. The architecture segment tells you immediately where you are and what instruction set you are targeting — which matters the moment you start compiling, packaging, or debugging.
zsh-powerline with architecture
I forked zsh-powerline to add my changes and keep them in GitHub for easy redeployment across machines. You can find the fork in the multizone branch: https://github.com/multizone-uk/zsh-powerline/tree/multizone
The core change is straightforward: add a dedicated colour for the architecture segment, wire it into the prompt configuration, and adjust the segment order to taste. The architecture value is pulled from uname -m, which returns arm64 on native Apple Silicon sessions and x86_64 on Intel or Rosetta sessions. Full setup details are in the README.
If you use Oh My Zsh — which has grown considerably in adoption and plugin quality since the original version of this article — the same approach works cleanly as a custom theme. The powerline font requirement is unchanged: install a Nerd Font or a patched powerline font and set it as your terminal font before you do anything else, otherwise the segment separators render as placeholder boxes.
One thing worth noting for 2026 setups: if you manage your dotfiles with a tool like chezmoi or yadm, the zsh theme file drops in cleanly as a managed template. That makes deploying the same prompt across a new MacBook, a cloud dev environment, or a remote Linux server a single command rather than a manual copy-paste exercise.
Terminal settings
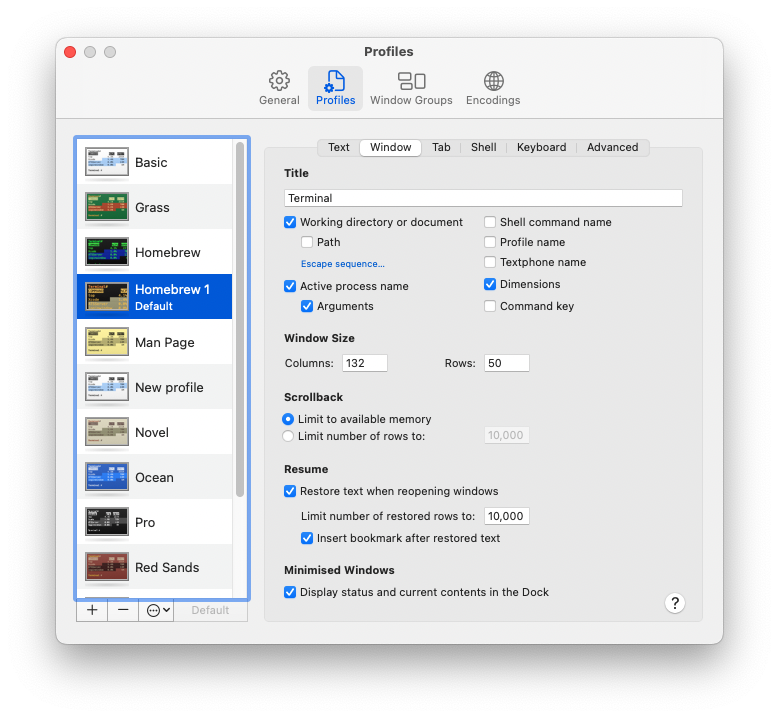
I rarely touch terminal settings on macOS, but while building this prompt I made a few adjustments worth sharing. I use 132×50 columns and rows — a deliberate callback to 132-column listing paper — and a larger font size than I used to get away with.
On macOS Sequoia and later, the default Terminal.app profile system is unchanged in structure but the built-in profiles have been refreshed. If you are starting from scratch, duplicating the Pro profile and then applying the settings below is the quickest path. Alternatively, iTerm2 and the increasingly popular Ghostty terminal both import and export profiles as JSON or plain text, which pairs well with a dotfiles repository.

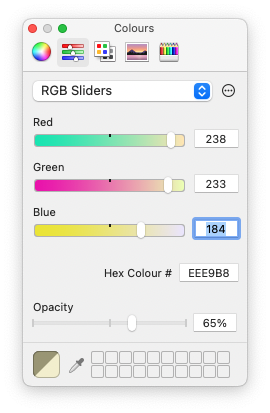
Text colours
The colour choices here are deliberate and personal. The amber and orange tones reference the Sun workstation terminals I spent years in front of. On a modern Retina or Liquid Retina display they are easier on the eye than stark white, and the contrast between normal and bold text is immediately readable without being harsh.
Using sysctl to identify the processor in your Mac
It is not required to make the prompt work, but worth knowing: the macOS sysctl command exposes detailed CPU branding information that goes well beyond what uname -m returns.
% sysctl -n machdep.cpu.brand_string
On an Apple Silicon Mac this returns the full chip identifier — for example Apple M4 Pro — while on an Intel machine it returns the Intel marketing string including clock speed. This is useful for documentation, for bug reports, and for confirming exactly what silicon is underneath when you are diagnosing architecture-specific behaviour. On Apple Silicon it also serves as a quick sanity check that you are not inside a Rosetta session when you expect a native one, since uname -m will return x86_64 in a Rosetta shell regardless of the physical chip.
For a more structured view of the full system — particularly useful when managing a mixed fleet — system_profiler SPHardwareDataType gives you chip, memory, serial number, and provisioning status in one output, and it works consistently across all current macOS versions.
- Details

Terminal prompt with architecture — macOS and Linux in 2026
In 2026, the terminal is more relevant than ever. Apple Silicon is now the default across the entire Mac lineup, ARM-based Linux machines are commonplace on the desktop and in the cloud, and Rosetta translation layers mean that knowing which architecture your shell is actually running under is genuinely useful information — not just a curiosity. At the same time, zsh has been the default shell on macOS since Catalina, and Ubuntu ships with it readily available, so a well-crafted zsh prompt is a practical investment that pays off every single day.
There are plenty of shell customisation frameworks around — Oh My Zsh, Starship, Powerlevel10k — but the most useful approach for software development and DevOps work is still a powerline-style prompt: structured, information-dense, and fast. The key constraint is that modifications must not hurt performance and must not be distracting. Every element in the prompt should earn its place by answering a question you actually need answered right now.
With Apple Silicon Macs routinely running both native arm64 processes and x86_64 processes under Rosetta 2, and with cloud and local ARM Linux machines now sitting alongside traditional x86_64 servers, the CPU architecture is exactly that kind of essential information. A quick glance at the prompt tells you whether you're building natively or under emulation — which matters the moment you start compiling, running containers, or installing packages.
The amber text colour is a deliberate nod to the real terminals I started on.
When you SSH into a different machine that shares the same zsh environment, the prompt immediately surfaces the username, hostname, CPU architecture, git branch, and OS symbol — so you always know where you are and what you're running on. The git branch only appears when you cd into a repository. The OS symbol turns green when the last command exited cleanly, red when it didn't. That's it. Useful, not noisy.
{ToC}
macOS (Apple Silicon and Rosetta)
The macOS prompt shows username, hostname, architecture, git branch, exit status, OS symbol, and shell prompt character. On macOS the OS symbol is the Apple logo. On an Apple Silicon Mac you'll typically see arm64 in the architecture segment, but if you've launched a Rosetta-translated shell — or you're inside a Homebrew x86_64 environment via arch -x86_64 zsh — the prompt will show x86_64 instead. That single segment has saved me from more than a few puzzling build failures.
Powerlevel10k remains a popular alternative for macOS users who want instant prompt rendering and a rich configuration wizard, but it adds complexity. For a minimal, auditable setup where you understand every line, a lean zsh-powerline fork is still the better choice.
Ubuntu Desktop 24.04 LTS
Ubuntu Desktop 24.04 LTS (Noble Numbat) is the current long-term support release as of 2026, and the prompt setup works identically here. The username, hostname, architecture, git branch, exit status, and OS symbol all appear just as they do on macOS. On Ubuntu the OS symbol is the Circle of Friends logo. ARM64 Ubuntu installs — increasingly common on devices like the Raspberry Pi 5 and various Qualcomm-based laptops — display arm64 in the architecture segment, making it immediately obvious you're not on a conventional x86_64 desktop.
If you're running Ubuntu inside WSL2 on a Windows ARM machine, the architecture segment is equally valuable: WSL2 on ARM hardware can present either arm64 or x86_64 depending on how the instance was configured, and the prompt makes that unambiguous.
zsh-powerline with architecture
I forked zsh-powerline to add my changes and keep them in GitHub for easy redeployment across machines. The fork lives in the multizone branch: https://github.com/multizone-uk/zsh-powerline/tree/multizone
The changes are minimal by design. I added a colour segment for the architecture display, injected the CPU architecture — pulled from uname -m — into the prompt configuration, and adjusted the overall segment order to suit the way I actually work. Full details are in the README. Because the architecture is resolved once at prompt render time using a simple shell substitution, there's no measurable performance cost.
For anyone starting fresh in 2026, Starship is worth a look as a cross-shell alternative — it's written in Rust, renders quickly, and has built-in support for showing system information including architecture. That said, it requires an external binary and a Nerd Font, which adds friction on fresh servers. The zsh-powerline approach described here needs nothing beyond zsh itself and a handful of Unicode characters your terminal almost certainly already supports.
Terminal settings (macOS)
macOS Terminal settings rarely need touching, but when I last revisited them I settled on a few preferences worth sharing. I use 132×50 columns and rows — 132 columns is a nod to the old greenbar listing paper that was standard on line printers, and 50 rows makes good use of a modern display without feeling overwhelming. Font size has crept up over the years; larger text is simply easier to read for long sessions, and on a high-DPI Retina display there's no reason to squint.
The amber-on-black colour scheme is a deliberate choice. It evokes the VT220-style terminals I first used at Sun Microsystems in the 1980s, and in practice it's easy on the eyes during long sessions in a way that high-contrast white-on-black isn't always.
Text colours
If you use iTerm2 or the newer Ghostty terminal — which has gained significant traction since its public release and handles true colour and ligatures particularly well — the same colour values translate directly. Ghostty's configuration file makes it straightforward to replicate the amber palette without going through a GUI.
Terminal settings (Ubuntu Desktop 24.04 LTS)

GNOME Terminal on Ubuntu 24.04 behaves the same way as on 22.04 for the purposes of this setup. If you've switched to the new GNOME Console application that ships by default in some Ubuntu flavours, note that its profile management is more limited — sticking with GNOME Terminal or installing Ghostty gives you the full colour control shown above.
- Details

In this article, we will walk you through the entire installation process of Ubuntu 24.04, a Long Term Support (LTS) release with five years of support, ensuring that your system receives timely updates and enhancements. We will cover everything from downloading the ISO image to creating bootable media, and finally, the installation steps themselves. If you’re wondering how to get started with Ubuntu 24.04, you’re in the right place. For those seeking to explore Ubuntu or in need of a reliable operating system, Ubuntu 24.04 is a commendable option.
TL:DR – The installation of Ubuntu 24.04 involves downloading the Ubuntu ISO, preparing bootable media, configuring BIOS/UEFI settings, and following through the installation wizard. You'll have to make some choices about apps and proprietary software on the way. Users can expect a robust OS with updates for five years.
- Details

By default Joomla uses the icon assets in /media/system/images/. These are the Joomla logo formatted for use as a favicon. (Like this: ![]() ).
).
<link href="/media/system/images/joomla-favicon.svg" rel="icon" type="image/svg+xml">
<link href="/media/system/images/favicon.ico" rel="alternate icon" type="image/vnd.microsoft.icon">
Custom Cassiopeia template favicon
There are a couple of ways of getting custom favicons (Like this: ![]() ) in your new Joomla site based on the Cassiopeia template
) in your new Joomla site based on the Cassiopeia template
- Details

(SM G900F)
Using a custom ROM from LineageOS, you can install Android 11 on a Samsung Galaxy S5 from 2014! You have to use rotten cryptic tools to install a custom recovery partition on the device before you can install Lineage OS on it. This isn't too difficult provided you aren't afraid of the command line. You install Lineage OS and then Open Google Apps should you want them before rebooting and - voila it works perfectly as far as I can tell - the Android build has none of the Samsung crapware - either the built in obsolescence in these devices is staggering, or the S5 was supremely over specified at the time!
The Samsung Galaxy S5 is a discontinued Android-based smartphone with 4G LTE which was launched at Mobile World Congress in Barcelona, Spain, in 2014 and generally available in April 2014
- Details

I suppose the number one download for brew is wget which is missing from macOS probably due to its GPL licence which has terms Apple might prefer to avoid bundling directly into macOS.
WGET
wget is a command-line tool used to download files from the internet. It supports HTTP, HTTPS, and FTP protocols.
Key Features:
- Non-Interactive: Works in the background without needing user interaction, making it ideal for scripts or automation.
- Recursive Downloading: Can mirror entire websites by downloading pages, images, and other linked files.
- Resume Support: Can continue interrupted downloads.
- Flexible Options: Supports proxies, authentication, and rate limiting.
TL:DR – brew install wget
- Details

If you find yourself looking for applications optimised for Macs with Apple Silicon, you're not alone. With the transition to Apple’s M series of silicon chips (M1, M2, M3 and M4) users are on the lookout for software that can fully exploit the capabilities of these machines. This article is a guide you through a curated list of the best apps, spanning various categories such as creativity, productivity, development, essential tools, and gaming. Keep reading to discover how you can elevate your Mac experience.
In this overview, I will showcase not just popular applications but also those with specific appeal to distinct user bases, ensuring that whether you are a writer, designer, developer, or simply looking to have some fun, there’s something for everyone. For further exploration of Apple’s native app ecosystem, you may refer to the official Apple App Store.
TL:DR – The transition to Apple Silicon has opened a plethora of possibilities for Mac users. In this article, we discuss top apps that leverage the full potential of Apple's M1, M2, M3 and M4 processors, neatly divided into various user-friendly categories. Explore creative suites, productivity enhancers, development tools, essential apps, and more to ensure your Mac experience is as seamless and powerful as possible.
- Details
Read more: Maximum Mac Performance: The Best Apps for Apple Silicon